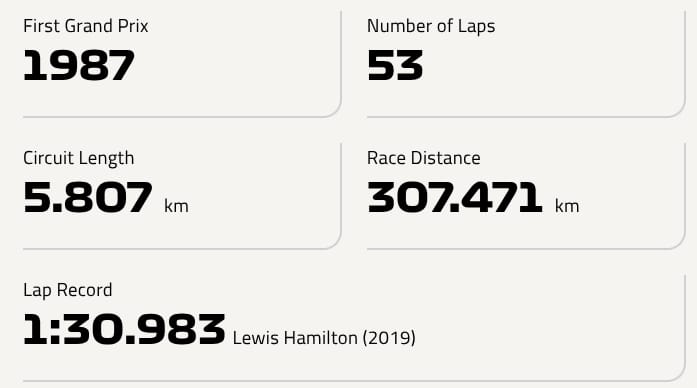
Suzuka is a perfect mix of speed, precision, and bravery. With its high-speed corners, technical sections, and legendary corners like 130R and the S-Curves, it remains one of the most challenging and rewarding tracks in Formula 1. Only the best can master it!

Japan GP Summary
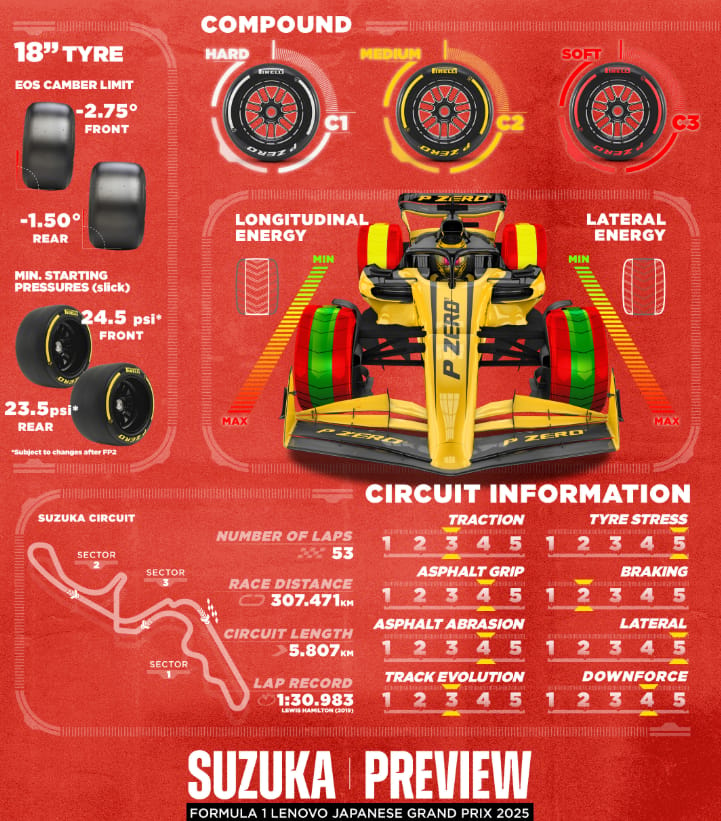
The C1, the hardest compound of the 2025 range, makes its season debut at this the third round, joined as usual by the C2 and the C3. That’s because Suzuka is one of the toughest tracks on the calendar when it comes to tyres and Pirelli has therefore always selected the hardest trio of compounds.
Something new for this year is the fact that a large part of the track has been resurfaced, from the exit of the last chicane to the end of the first sector. This is an important section, as it features medium and high speed corners, some of them long ones, such as the first two after the start-finish straight, where tyres come under a lot of stress.
C1 (Hard) – Most Durable, Least Grip
Best suited for high-temperature, high-energy circuits with abrasive surfaces.
Takes longer to warm up but provides consistent performance over long stints.
Used when tyre longevity is more important than outright speed.
C2 (Medium) – Balanced Performance
A step softer than C1, offering a balance between durability and grip.
Versatile, performing well on a wide range of tracks.
Requires a good warm-up phase but works well for mixed race strategies.
Often a go-to compound for races where teams aim for a one-stop strategy.
C3 (Soft) – Highest Grip, Fastest Wear
The softest of the three, providing the most grip but also wearing out the fastest.
Ideal for qualifying laps and short stints in the race.
Performs best on smooth, low-energy tracks or in cooler conditions.
Not suitable for long runs due to rapid degradation.

Tyre selection at Japan GP
Here's a detailed turn-by-turn analysis of Suzuka Circuit, focusing on the challenges, strategies, and key moments at each corner!
Sector Breakdown

Japan GP Race Track
Sector 1: The High-Speed Rhythm Test
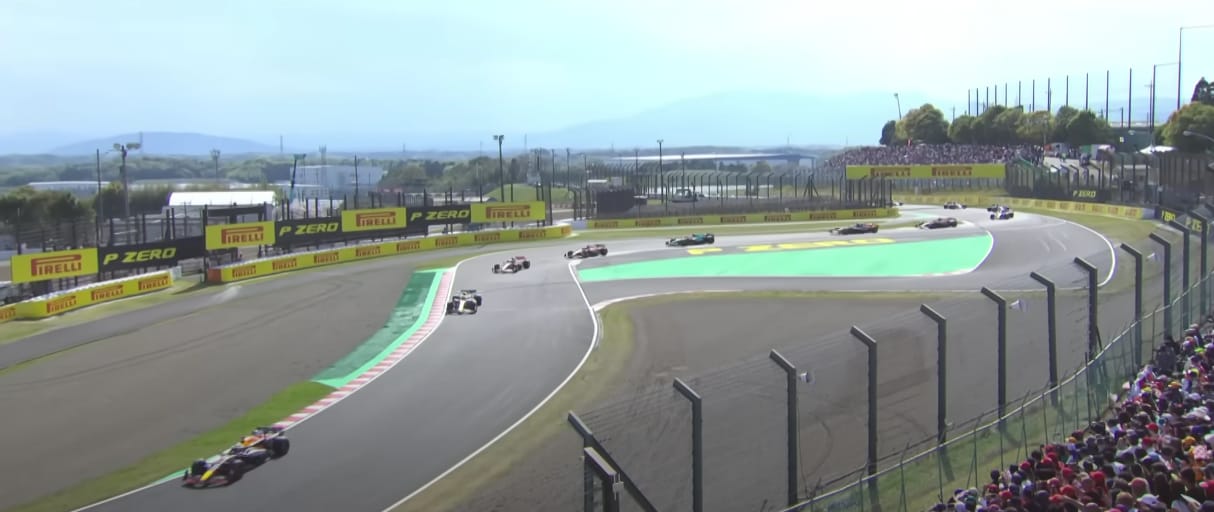
Turn 1 & Turn 2 – The Opening Challenge
The race roars to life as drivers storm down the main straight, reaching speeds over 300 km/h (186 mph) before facing Turn 1, a fast, sweeping right-hander. This isn’t a heavy braking zone like many other first turns in F1. Instead, drivers only lift off slightly before committing to the corner.
But Turn 1 doesn’t stand alone it flows directly into Turn 2, a much tighter right-hander that demands sharp braking while still turning. This is tricky because braking mid-corner can easily unsettle the car. If a driver runs too deep into Turn 1, they compromise their exit from Turn 2, losing momentum into the next section.
👉 Key Challenge: Balancing speed and braking while keeping the car stable through the transition.
Turns 3-6 – The Legendary S-Curves
Welcome to one of the most famous sections in all of motorsport, the S-Curves. This series of fast left-right-left-right turns is all about rhythm and flow. If a driver gets Turn 3 slightly wrong, it throws off every corner that follows.
Turn 3 (Left): The first S-Curve, where drivers begin the rhythm.
Turn 4 (Right): The car shifts weight quickly; too much steering here can kill speed.
Turn 5 (Left): The midpoint of the sequence good weight transfer is critical.
Turn 6 (Right): A slightly slower exit, leading into the next section.
Drivers can’t afford to attack these corners too aggressively because losing balance will cost them speed all the way through. The best drivers use the car’s aerodynamics to stick to the track while keeping their tires alive for later in the lap.
👉 Key Challenge: Smooth weight transfer and keeping momentum high without oversteering.
Turn 7 – Dunlop Curve: A High-Speed Sweep
After the S-Curves, drivers go full throttle into Turn 7 (Dunlop Curve), a long, sweeping left-hander taken flat-out in modern F1 cars. This corner might seem simple, but it’s tricky because:
The exit leads directly into the next sector. Any mistake here means carrying less speed into the next critical braking zone.
Grip levels can change based on track conditions. If it’s damp or slightly off-line, drivers risk understeering into the gravel.
👉 Key Challenge: Committing to full throttle while staying on the racing line.

Sector 1 - Turn 1,2,3
Sector 2: The Precision Challenge
Turns 8 & 9 – The Deadly Degners
Now things get technical. The Degner Curves are two fast, tight right-handers that can end a driver’s race in an instant.
Turn 8 (Degner 1): A medium-speed right-hander that requires early braking. Drivers can take a bit of curb here, but too much will unsettle the car.
Turn 9 (Degner 2): A much tighter right-hand corner that follows immediately. Here, drivers must brake hard while staying tight to the inside. Going too wide means running onto the gravel or worse, into the barriers!
This section has zero margin for error. Even F1 legends have been caught out here by braking just a fraction too late.
👉 Key Challenge: Finding the perfect braking point while keeping the car balanced through both turns.
Turn 10 – The Short Sprint
This isn’t much of a turn just a slight right kink leading up to the next big challenge. Drivers stay full throttle, preparing for a major braking zone ahead.
Turn 11 – The Hairpin: A Brutal Slowdown
This is the slowest corner on the track. After blasting through the high-speed Degners, drivers slam the brakes for Turn 11 (the Hairpin) a tight left-hand bend taken in first or second gear.
Overtaking is possible here, but only with a perfectly timed move.
A slow exit will kill top speed down the following straight.
Wheelspin is a big risk coming out of the corner too much throttle too soon, and the rear end slides out.
👉 Key Challenge: Nailing the exit without spinning the tires.
Turn 12 – The Long Right-Hander
After the slow Hairpin, the drivers go full throttle into Turn 12, a long, fast right-hand bend. It’s not an overtaking spot, but it’s crucial to set up for Spoon Curve.
👉 Key Challenge: Carrying as much speed as possible without compromising Spoon Curve.
Turns 13 & 14 – Spoon Curve: A Speed Trap
Now comes the famous Spoon Curve, a tricky double-apex left-hander.
Turn 13 (First Left): Requires a delicate brake input—too much speed here will push the car wide.
Turn 14 (Second Left): The key to this turn is the exit. If a driver goes too wide, they’ll lose tons of speed down the next straight.
👉 Key Challenge: Perfecting the exit to carry speed into Sector 3.

Sector 2 Turn 11
Stay Safe Online with NordVPN! 🔒💻
Tired of hackers, trackers, and geo-restrictions? With NordVPN, you get lightning-fast speeds, military-grade encryption, and access to content worldwide all with just one click! 🌍⚡
✅ Secure your data on public Wi-Fi
✅ Stream without limits anywhere
✅ Protect your privacy with a strict no-logs policy
Stay anonymous. Stay protected. Get NordVPN today! 🚀🔐 Click here for a large discount and peace of mind

Sector 3: The High-Speed Finale
Turn 15 – 130R: The Ultimate Test of Courage
One of the fastest and most legendary corners in F1, 130R is a long, sweeping left-hander taken at over 300 km/h (186 mph). It used to be one of the scariest corners in racing, but modern cars now take it flat-out if the driver is brave enough!
If it’s wet, 130R becomes a massive risk, and drivers may need a slight lift.
Running wide here means hitting the curb at high speed, which can send the car off track.
👉 Key Challenge: Keeping full throttle while staying on the racing line.
Turns 16 & 17 – The Casio Triangle Chicane: The Last Chance
The final overtaking spot! After the back straight, drivers slam the brakes into the Casio Triangle, a tight left-right chicane.
Turn 16 (Left): Heavy braking required this is where drivers can make or lose a last-second position.
Turn 17 (Right): A quick switch to the right, where a perfect exit is key for a strong run to the finish.
It’s easy to lock up here, and if a driver overshoots, they’ll lose all momentum onto the main straight.
👉 Key Challenge: Braking late without losing control.
Turn 18 – The Sprint to the Finish
One last small right-hand kink, and it’s full throttle to the checkered flag!

Sector 3 - Turn 16, 17, 18
Suzuka is a perfect blend of high-speed sections, technical corners, and intense overtaking zones. It’s a track that rewards precision and punishes even the smallest mistakes. That’s why it remains one of F1’s greatest challenges only the very best can conquer it!
Tsunoda has also been promoted to the Redbull Racing team. This is his opportunity to shine at his home grand prix in the top team equipment. He is going for a podium and no reason he shouldn’t try.

We believe in Yuki!
Watch Last Years Highlights
Race Weekend

Japan Race Weekend GMT
Lights Out, Let’s Race!
Founded in 2020, Advanced SimRacing (ASR) is the fastest-growing North American racing simulation chassis manufacturer and digital motorsport equipment retailer. ASR designs and builds the sturdiest and most durable aluminum profile racing simulation cockpits available in the market today.


W3 Schools is a great platform to learn all kinds of coding languages. The courses are extremely helpful and intuitive. Sitewide 20% Discount With Link.

